Replacing piston cups on concrete pumps can be done in a variety of ways.
At JED Alliance, we specialize in the restoration of concrete equipment. So we replace piston cups frequently and have developed our recommended method to replace mud cups safely. To avoid accidents, we recommend taking the utmost precaution when working on hydraulic parts, especially working in enclosed spaces.
Check out this video to see our concrete pump technicians in action, and then check out the additional tips below:
When reinstalling the piston cups, one of the biggest challenges is to position them correctly so they go into the material cylinders straight. Once in position, use the differential cylinder itself to help you push the piston into the material cylinder.
Make sure not to go too far in so you have plenty of room to set the nuts and bolts. You can use the hydraulic system to help you displace the mud cups to any direction you need them.

Maintenance is key
It’s important to maintain the proper level of water or any kind of lubricant in the concrete pump’s water box. This keeps the pistons cool and lubricated for their trip through the material cylinders. For example, a Putzmeister TK70 concrete pump can range between 40 to 45 strokes per minute. This level of friction can be gruelling on the rubber material of the piston, causing premature wear and eventual tear of the borders.
If you use water instead of a lubricant in the water box, it is vital that you drain it completely after you finish each pump job.
As the pistons move forward and backwards through the material cylinders, the differential cylinders (the 2 hydraulic cylinders close to the tongue and behind the water box) also move. The heat from this friction causes the rubber seals to expand and contract. When the seal expands, you have no problem. But when it contracts, if water “that you forgot to drain” is left in the box, the seals take it in, filling the hydraulic system with water. This eventually leads to pump damage.
If your pump operator says he has been doing this for years, but doesn’t drain the water at the end of each pump job, you’ll know that he is just a rookie.

The Hopper Side
Another important side to properly maintain at the end of each concrete pour is the “hopper side”, which is where the material is being pushed from.
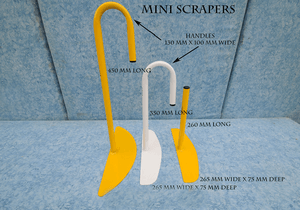
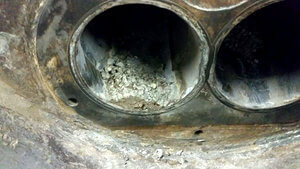
When you finish each job and wash up, take a peek inside the material cylinders from the inside of the hopper. Look for leftover concrete or grout and use a cleanup hook like one of those shown at the right.
Scrape out any leftover material, with care not to scratch the chrome off the concrete cylinders. Spray water inside the cylinders to avoid allowing the material to harden inside the cylinders.

Hardened material in the cylinders can cause the pistons to tear and grout will start leaking into the water box. It might be even beneficial to stroke each side slowly with the piston cups, but you have to be VERY careful as you do this. First tighten the flow control, so the pistons move REALLY slowly and then go through one cycle on each side. Make sure all your body parts are outside of the hopper (don’t stick your head in there) and spray water while the cycle is taking place. Spray the water from the outlet of the machine (where you connect your hose), into the material cylinders. Engage the pump and have the pistons push out leftover material.
Replacing piston cups on concrete pumps and other key maintenance and repairs will keep your concrete pump in top condition. Keep it greased, keep it clean, and your pump will last a long time. And you know it’ll be less likely to break down in the middle of a big concrete pour.
